 It is universally acknowledged that mosaic is one art form that people are more inclined to touch than any other. We are drawn to it, we want to run our hands along it's smooth cool surface. There is something calming and sensual about it.
Your hands are the best judge in determining whether it is a well crafted, functional, quality mosaic. It can be very discouraging to to spend hours creating a piece (or spend your hard earned money purchasing a piece) only to watch people grimace as they touch it or quickly pull their hands away from it because of sharp or uneven areas of the surface.
We want to incorporate art and beauty onto a function piece that we use our every day lives. The last thing I want is a surface that scratches or cuts my fingers, or worse still, topples my glass of wine!
Before I address how to level and smooth your mosaic surface, I feel I should briefly mention a couple pointers that both a beginner and novice should always consider before tackling a mosaic project.

First, a bit about your mosaic "base". Contrary to popular belief, a birdhouse, small or large, is NOT the best beginner or novice project. I'm sure many of the novices out there have already found out. It is far more difficult to mosaic a birdhouse and end up with a piece that has smooth level surfaces and clean edges, similar to heirloom quality pieces.
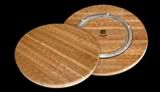
May I suggest that it is best to start with a smooth flat surface and a raised edge.
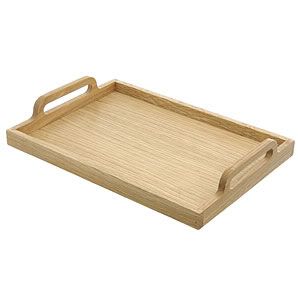
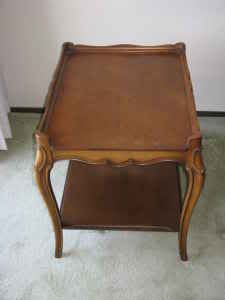
When you are ready to tackle how to create finished edges, a lazy susan or small table is ideal.
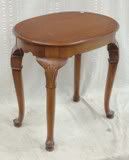
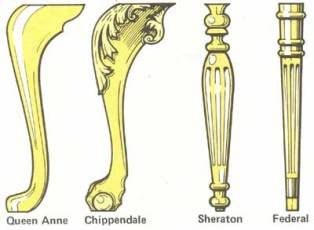
When choosing a small table, try to select one that has nice lines and curves; such as queen ann style legs or turned legs. It will add to the overall appearance of your mosaic piece! Check thrift stores and flea markets for incredible deals.
Before you even being to adhere your first china tile, be sure you have primed and then painted the piece. It is far more difficult to paint your piece after you have finished laying your mosaic design. Be sure to cover the area of the base you will place the mosaic, do take care not to get any of the top coat in that area.
CREATING A LEVEL SURFACE: DIRECT PRESS METHOD
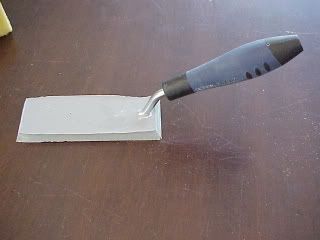
The Direct Press method is of my own creation that was born from necessity. When creating a broken china mosaic, the Direct Method is the likely choice. The problem, since china pieces are usually of varying thickness, it was difficult to achieve a level surface.
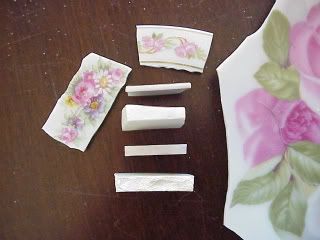
I knew I could build up the thinner pieces with thinset, but how can I be sure I’m setting each buttered piece firmly onto the mosaic base, and of equal height. I obviously needed a guide of some sort. My solution was a flat, scrap piece of wood (the “Press”) and my thickest pieces of nipped china (tile). I would then press the freshly buttered piece only as far as the thickest pieces (anchor) allowed, thus resulting in a uniform height.
How to determine the size of your “Press”:
Your "Press" should be straight and free of curves, warps, or holes and the width and length should be slightly larger than the area you are working in. The Press should be sturdy enough to not bend or give when applying a moderate amount of pressure.
Chances are you will need more than one press; one for a larger areas, one for smaller areas.
Determining the best adhesive for varying thickness of china pieces:
For the thickest china pieces (that are of equal thickness) you can butter a thin layer of thinset onto the back of the china piece. You may also use a liquid adhesive such as Weldbond or Gorilla Glue. I prefer to use Weldbond, it doesn’t add additional thickness the way the thinset would.
For thinner china pieces use thinset. While thinset is an adhesive, it enables you to build a thin piece to equal the thickness of thickest pieces you will be using.
Buttering thinset onto the back of china pieces:
You will quickly develop a "feel" for how much to butter onto the back of the thinner china pieces. Too little, your thinner pieces will not be secure, which will cause the china piece to wobble, tilt, and sink into the thinset. Too much, you will have more to clean up between the china pieces.
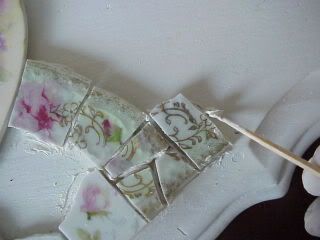
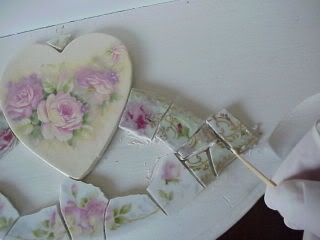
Using the Press:
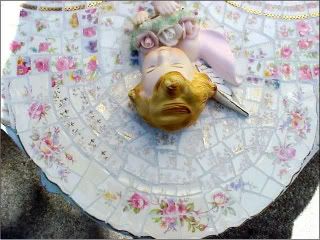
In this example, the thickest pieces is the heart focal. The focal was set in place using Weldbond. All subsequent thinner pieces will be "pressed" to the same height of the focal.
Since the next tile is thinner than the focal, butter a bit of thinset on the back of the thinner tile, then gently place it onto the base. Next, hold the press over the thickest (anchor) tile and the freshly placed tile, then gently press down until your "press" rests on the thickest china tile. Be sure to keep the press as level as possible.

Be sure the press size is appropriate for the piece you are working on. I have several different press sizes: 4" x4", and 8" x 4" and my table/count/dresser top base press which is about 18" x 12".
As you progress through you mosaic, you will find you are moving further away from your original anchor. Keep in mind that once the thinset has harden (beneath the buttered tiles), that piece may now act as an anchor. Take care to be sure the thinset has completely dried and is hard, otherwise you risk pushing that piece further into the thinset. To know if it is hard enough, gently press with your finger, if there is any softness to it, it is not competely dried. Thinset usually dries within 24 hours.
Now, you may think, why not just spread the thinset in a small area and place several tiles down and press them all at once. Been there, done that! The cleanup was a nightmare! The longer thinset stays on the tiles, the harder it becomes. By cleaning the tops of tiles before the thinset underneath the tile has harden you will risk pushing that tile down lower than the other tiles. Also, most thinsets do not dry white. Having too much thinset in your grout lines will darken white grout.
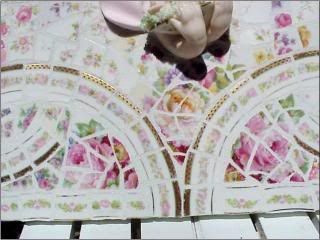
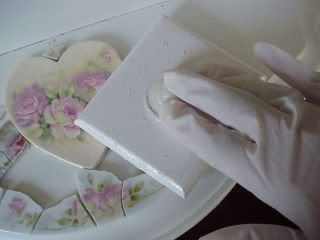
For smoothness: when grouting, make sure to push the grout well into all the spaces between the tiles and the base (such as a the side walls of a tray). Also, when cleaning the grout off the surface, be very careful not to remove the grout lower than the surface of your china tiles. Your fingers will be the best judge in knowing if you have removed too much grout, as you will feel the sharp sides of the tile edges.
A sponge or damp cloth will remove too much grout if you aren't careful. I use a small rubber float. I lightly squeegee some grout off the surface of the mosaic with the edge of the rubber float, then I clean each china tile one by one, doing my best to avoid the grout lines. I use a damp paper towel. I find that a soft cloth is too thick and you inadvertently wipe off too much from the grout lines.
Before smoothing out any sharp corners of the tile, clean the surface of grout residue, then let the piece dry completely. After the piece has dried, using your fingers and palm, lightly feel around the piece for any sharp tile corners. A quick touch of a dremel will smooth it out. I recommend a dremel over a drill as it is easier to lightly grind off that sharp corner without hitting the grout line or taking too much off the tile. If you don't have one and do not wish to invest in one, see if you can borrow one. Otherwise you might try a metal file.
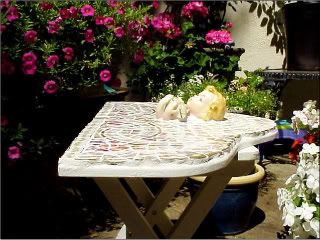
It is more time consuming to apply these methods, but the end results will be well worth it! You will have made a beautiful, quality heirloom piece that you will cherish and proudly display for years to come! You will find yourself running your hands over the smooth and level surface time and again. You will get loads of compliments and when asked "where did you get that beautiful piece?" you will beam with pride as you reply "I made it myself!" ;-)
If you have any questions, feel free to email me. I will be happy to clarify or provide more detail.
Please note, my content is copyright with exclusive rights. Please do not copy my content (text, photographs, illustrations) into any printed form or any form of publication.
Enjoy!

6 comments:
Tina.... Excellently explained and very clear.. I have been collecting Rose dishes for eons... And have been slowing gearing up to mosaic a project. Like everything else I do, I gather as much information before even starting. Your tips were great and I feel even more comfortable getting started. Thanks girlfriend...xoxo~Kathy~ @ Sweet Up-North Mornings.blogspot.com
Kathy, don't forget to take the photos! I'd love to see it! If you have any questions, feel free to email anytime!
Good luck!
Tina
Hi Tina,
I found your blog a while back and that is when the mosaic bug bit me. I can't tell you how much this tutorial enlightened me to get the perfectly smooth finish I was after. Funny, I just started a blog and mentioned that there was a site I saw and that was what inspired me to do mosaics but couldn't remember how I stumbled on your site...you were lost in cyber world. Anyway, so glad to have found you again. Love your creativity and informative tutorials!!!! Sue
Hi, I am getting ready to tackly my first project and it's a quite a large one! I am so glad I found your blog and thanks so much for the great information and tutorial on how to create a great looking finished project. This is invaluable!
We are now following you and invite you to come and follow us.
Thanks so much!
Hi,
I love your website...so much invaluable information! I've just started doing china mosaic and I have some questions. I am doing a mosaic on a glass garden table I have. We get quite a bit of rain here and it will be outside during the summer. What can I use to make it weather/water proof? Is it ok to use thinset on glass?
I can't wait to have a finished piece!!
Lori
Hi Lori, Your project sounds so exciting! I've always wanted to do a mosaic garden table. It really depends on the tiles you are using and if they are/aren't of the same thickness. I'm not sure what type of tiles you are using (glass tiles, broken china, ceramic tiles, etc.) Feel tree to email me with your questions @ enchantedrosestudio@yahoo.com
Good luck with your piece!
Post a Comment