 Generally, there are two basic methods to creating a mosaic piece: direct method and the indirect method. In working with vintage china and the varying types of bases.
I have also included a brief description of my Direct Press Method.
DIRECT METHOD

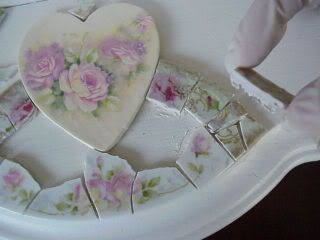
The direct method is where the mosaic tile pieces are adhered face up, one by one, directly onto the surface you are going to mosaic (such as table tops, trays, birdhouses, etc.).
This is a much faster method. The disadvantage is; if you tiles are not equal in thickness, the result will be a rough and uneven mosaic surface. If an uneven surface is a planned aspect of your design, then the direct method using china tiles with varying thickness will give you a jagged result.
INDIRECT METHOD
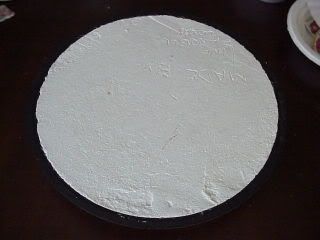
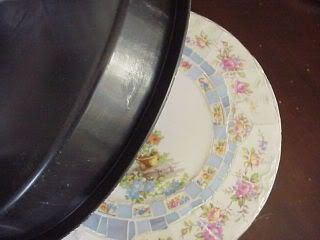
The indirect method is where the all the tiles, or sections of the design tiles, are temporarily fixed face down into a removable base (such as cement molds) or backing (such as contact paper or brown mounting paper).
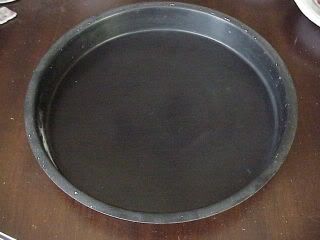
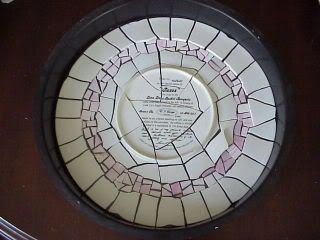
When using a mold, the entire design is laid out face down into the mold, then the mold is filled with mortar or cement; when dry, the mold is removed to reveal the face of the mosaic design. You can lay the tiles directly onto the bottom of the mold or use the backing to ensure a successful release once the mortar or cement has dried. If placing the tiles face down directly onto the mold, a releasing agent is first applied, such as Pam, silicone spray or Vaseline.
Backing material, such as brown mounting paper, mosaic mount, contact paper is useful when working in sections of a large base, such as murals and sculpture. The tiles are places face down onto the adhesive backing and then pressed into a prepared adhesive bed on the base. Once the adhesive (such as thinset or mortar) is set, the backing is removed from the tile face to revel the mosaic design.
The advantage of the indirect method is you can create a very smooth, flat surface. You can also create and assemble the design ahead of time and affix it to you base later.
One disadvantage is if the pattern or color of your tiles are not the on both the face and the back, since you must assemble the design face down, extra care and time must be taken to ensure your pieces are in the proper order before filling the mold with mortar/cement.
MY DIRECT PRESS METHOD
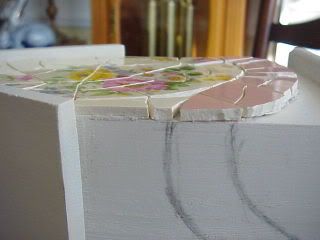
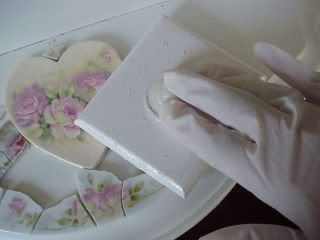
The Direct Press method is of my own creation that was born from necessity. When creating a broken china mosaic, the Direct Method is the likely choice. The problem, since china pieces are usually of varying thickness, it was difficult to achieve a level surface.
I knew I could build up the thinner pieces with thinset, but how can I be sure I’m setting each buttered piece firmly onto the mosaic base at an equal height. I obviously needed a guide of some sort.
My solution was a flat, scrap piece of wood (the “Press”) and my thickest pieces of nipped china. I would then press the freshly buttered piece only as far as the thickest pieces (anchor) allowed, thus resulting in a uniform height.
The disadvantage to my Direct Press method is that it takes much more time to complete your project.
Each method has both advantages and disadvantages. There is no wrong or right choice. It is up to you to decide which method will work best for the base you will be using and your desired result.
If you have any questions or comments, please feel free to leave a comment or email me for clarification or more information.
Please note, my content is copyright with exclusive rights. Please do not copy my content (text, photographs, illustrations) into any printed form or any form of publication.
Ciao!

6 comments:
Tina,
Thanks for the great tutorial. I have wanted to try making a mosaic and now feel I will have a good outcome. Cathy
You have great tutorials!!
I have so wanted to do mosaic.
(add it to the list of things i want to learn!!) =0)
Blessings,
Barbara Jean
Hope you do not mind, but i would like to pass your site on to my readers!
Your site is simply gorgeous..and your tutorials are wonderful. I have to come back when I can read further, with your help,maybe I will have confidence to try this.Your work is just beautiful..
Thank you so much for sharing!! This is a great tutorial!!!
I love your site and thank you so much for the tutorial on the two methods of broken china mosaic. For so long now I have been wanting to learn this beautiful art. Now I think I have the confidence to give it a go! Thank you so much for sharing your knowledge with us!
Hi, i am just starting out on this new craft/hobby and on my first project i have used tiles for design and glass tiles for edging which has left a small difference in level and am wondering if i just grout as normal? do i need to raise the edging tiles next time??
any help would be appreciated
thanks
Alison
Post a Comment